OpenVPN启用LDAP+GoogleAuthenticator认证.md.md
一、概述
在上一篇文章当中,我们实现了openVPN+LDAP的认证方式。
但往往在企业环境中,LDAP用户名密码可以说是一号走天下,一旦出现用户名密码泄露(粗心程序员传到github),那损失是巨大的,因此加上双因子认证,也是加上了一层保险。这里我们的双因子认证是通过GoogleAuthenticator实现的,因为他的原理比较简单,在业内也很通用。
二、安装
要实现LDAP+GoogleAuthenticator认证,openvpn需要安装两个插件
https://github.com/threerings/openvpn-auth-ldap
https://github.com/evgeny-gridasov/openvpn-otp
第一个实现LDAP登陆,第二个实现OTP。由于两个插件先后顺序需要兼容,必须使用最新版本。
#@安装LDAP插件
git clone https://github.com/threerings/openvpn-auth-ldap
cd openvpn-auth-ldap
#@安装依赖
yum install re2c libtool openldap openldap-devel openvpn openvpn-devel gcc-objc -y
#@下载安装包解压,开始编译
./regen.sh
./configure --with-openldap=/usr/ --with-openvpn=/usr/ CFLAGS="-fPIC" OBJCFLAGS="-std=gnu11"
make
make install
#@安装OTP插件
git clone https://github.com/evgeny-gridasov/openvpn-otp
cd openvpn-otp
yum install autoconf automake libtool* -y
./autogen.sh
./configure
make
make install
安装完成后可以找到这两个插件。(.so模块可以任意拷贝到其他目录使用的)
/usr/local/lib/openvpn-auth-ldap.so
/usr/local/lib/openvpn/openvpn-otp.so
三、服务器端配置
有了插件以后我们就可以修改服务器端配置了,主要用到了三个配置文件server.conf 主配置文件,ldap.conf和LDAP连接配置文件,OTP配置文件otp-secrets。
先看下server.conf
port 1194
proto tcp
dev tun

ca /etc/openvpn/easy-rsa/pki/ca.crt
cert /etc/openvpn/easy-rsa/pki/issued/server.crt
key /etc/openvpn/easy-rsa/pki/private/server.key
dh /etc/openvpn/easy-rsa/pki/dh.pem

topology net30
server 211.81.175.0 255.255.255.0

ifconfig-pool-persist ipp.txt

push "route 211.168.10.0 255.255.255.0"
push "route 211.168.20.0 255.255.255.0"
client-config-dir ccd

client-to-client
keepalive 10 120

cipher AES-256-CBC
comp-lzo
max-clients 1000

persist-key
persist-tun
status openvpn-status.log
verb 3

crl-verify /etc/openvpn/easy-rsa/pki/crl.pem
plugin /usr/local/lib/openvpn-auth-ldap.so "/etc/openvpn/auth/ldap.conf"
plugin /usr/local/lib/openvpn/openvpn-otp.so "password_is_cr=1 otp_secrets=/etc/openvpn/auth/otp-secrets"

#调用验证脚本,生成OTP共享密钥
script-security 2
auth-user-pass-verify /etc/openvpn/scripts/check_cn_on_connect.sh via-env

client-cert-not-required
#@reneg-sec服务器端会定期检查认证情况,默认3600秒一小时,使用OTP的话尽量时间长一些,否则客户端需要重新输入用户名密码和OTP一次性密码。
reneg-sec 0
然后需要配置/etc/openvpn/auth/ldap.conf
<LDAP>
     URL    ldap://10.127.100.48:389
     Timeout    15
     TLSEnable  no
     FollowReferrals yes
</LDAP>

<Authorization>
     BaseDN "ou=People,dc=ipcpu,dc=com"
     # User Search Filter
     #SearchFilter  "(&(uid=%u)(accountStatus=active))"
     SearchFilter   "uid=%u"

     # Require Group Membership
     RequireGroup   false
     #@@@@注意下面这个
     PasswordIsCR   true
</Authorization>
剩下的就是配置OTP相关内容了,/etc/openvpn/auth/otp-secrets
ipcpu otp totp:sha1:base32:LJYHR64TUI7IL3RD::xxx */etc/openvpn/auth/otp-secrets文件github上给出了很多例子,我们就用最简单的GoogleAuthenticator例子,中间那串"LJYHR64TUI7IL3RD"就是密钥,熟悉GoogleAuthenticator原理的,可以直接生成专用字符串和二维码

用手机端扫一下就可以用了,如下

四、客户端配置
客户端配置比较简单,除了关闭key认证以外,增加auth-user-pass和static-challenge,如下
client
dev tun
proto tcp
resolv-retry infinite
nobind
persist-key
persist-tun
verb 3
comp-lzo
remote-cert-tls server
route-delay 2
cipher AES-256-CBC
remote <SERVER-IP> 1194
ca ca.crt
#cert client102.crt
#key client102.key
auth-user-pass
auth-nocache
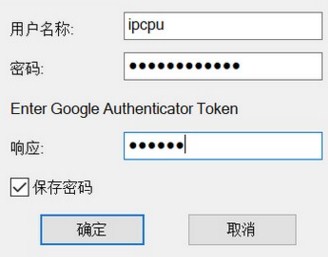
static-challenge "Enter Google Authenticator Token" 1
#@弹出验证框,1表示明文显示,0表示密文显示客户端登陆的界面如下
五、安全考虑
通过上面的描述,大家也基本清楚了GoogleAuthenticator,这只是一个将共享秘钥转化为一次性密码的工具而已,如果直接将生成的QR码发到用户邮箱里,那么这一层安全保障基本就是一个摆设。
实际生产环境要多方位考虑,建设安全认证中心。
参考资料
https://github.com/threerings/openvpn-auth-ldap
https://github.com/evgeny-gridasov/openvpn-otp